

A real immediate implant case from our Gurugram practice, using the socket shield technique, an advanced and complex implant procedure — explained the way it was explained in the chair.
Reviewed by: Dr. Ankur Gupta, BDS, MDS (Orthodontics) — Haryana Dental Council Reg. No. 1378A
The short answer
When a front tooth that had root canal treatment years ago breaks at the gum line, it usually cannot be rebuilt and has to be replaced. An implant can often be placed on the same day the tooth is removed. The bigger challenge on a front tooth is the gum: once the whole root is taken out, the thin bone at the front of the socket tends to shrink, and the gum line can drop with it. In the socket shield technique — an advanced and complex implant procedure — a thin slice of the root on the lip side is deliberately left in place, and the implant is placed behind it. That slice helps support the bone and gum in front — which is why, in this case, the gum line was preserved well enough that it only needed a fine laser touch-up before the final crown.
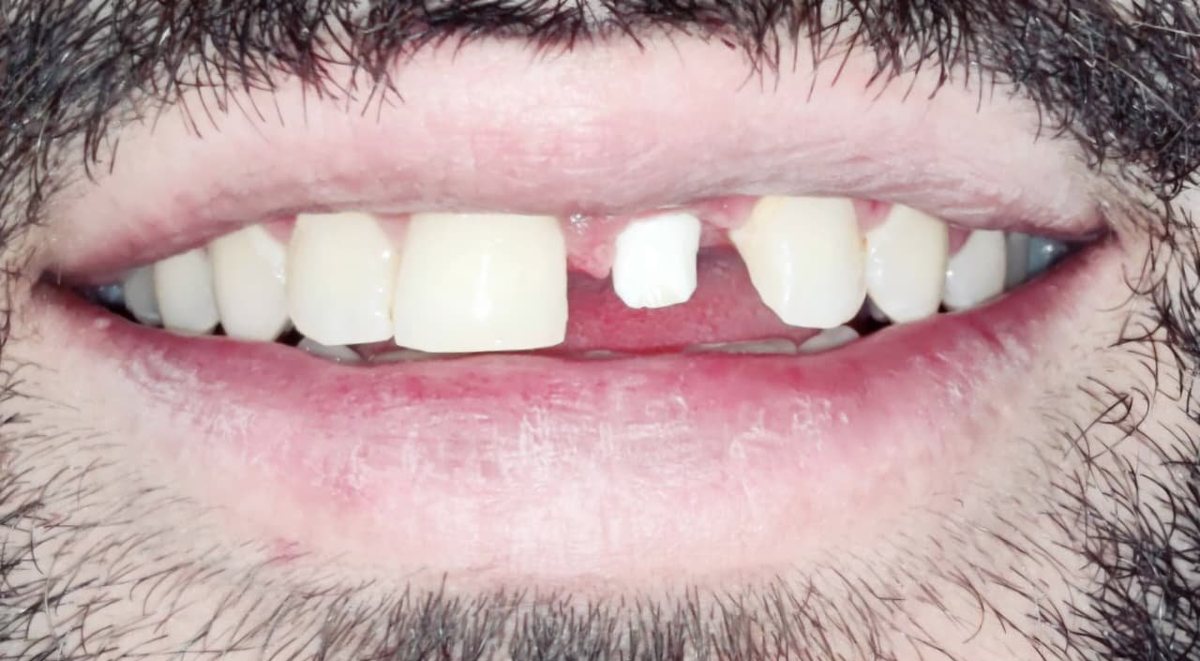
What the patient came in with
The patient, a young man of about 28, came in with his mother. His concerns were straightforward, and one of them set the timetable:
- An upper front tooth had broken; it had been root canal treated a long time earlier.
- He is a live performer and had a show the very next day — he could not appear with a gap in his smile.
- He wanted his smile to look as it had before, including the small natural gap between his two front teeth.
The deadline mattered, but it did not decide the treatment. What decided it was what we found when we looked at the tooth and the gum around it.
What we found on examination
On clinical and radiographic examination:
- The upper left central incisor (21) was fractured, with too little sound tooth left above the gum to support a new crown.
- The tooth had an old root canal filling, visible on the X-ray.
- The gum around the tooth was healthy and well shaped, and his lip line was high — when he smiles, the gum margins of the front teeth show.
That last finding shaped the plan. With a high lip line, the shape of the gum is as visible as the tooth itself; any drop in the gum over an implant would be seen every time he smiled.
Before treatment — the fractured front tooth
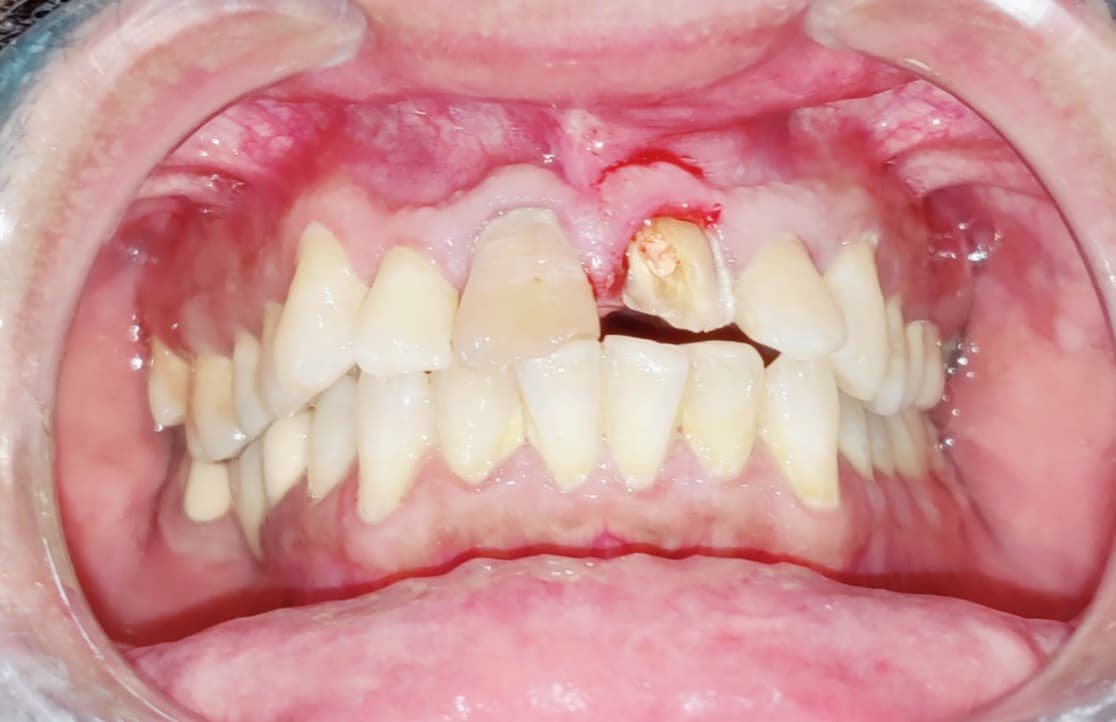
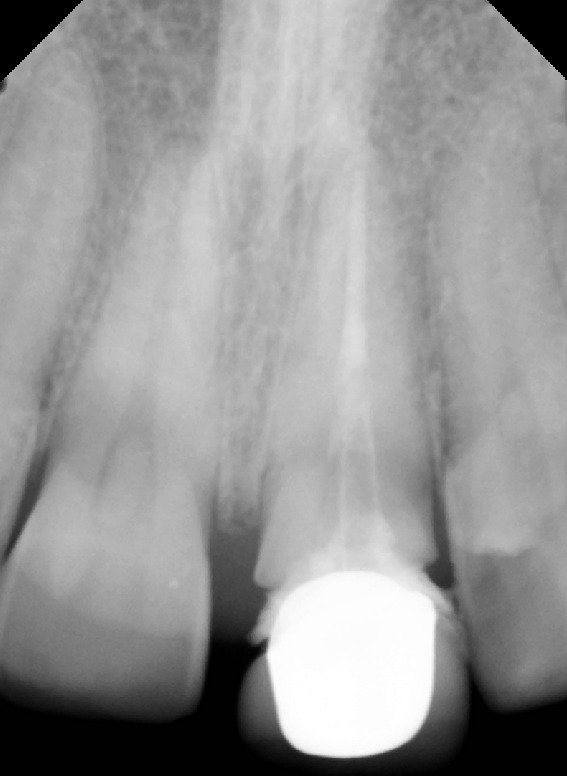
Clinical photographs are for educational purposes only.
Why the whole root was not simply removed
1. The front wall of bone is thin and tends to shrink
On upper front teeth, the bone covering the root on the lip side is often very thin, and much of its blood supply comes through the ligament around the root. When the whole root is extracted, that wall commonly shrinks over the following months — and the gum, which sits on it, can recede with it.
2. A receding gum line is hard to hide with a high lip line
A dropped gum over an implant can leave a crown that looks longer than its neighbour, or a grey shadow at the margin. In a patient whose gum shows when he smiles, that is exactly the area people notice.
3. Grafting later is a second surgery
Where the gum or bone has already shrunk, it can often be rebuilt with grafting — but that means additional procedures and healing time. Preserving the tissue at the start aims to avoid needing them.
The options considered
| Option | Where it is strong | Where it is limited |
|---|---|---|
| Bridge on the neighbouring teeth | No surgery; can be completed relatively quickly | Requires cutting down two healthy adjacent teeth; the bone under the missing tooth still shrinks over time |
| Extraction, healing, then implant | Well-established, predictable approach | Months with a removable or temporary tooth; the gum and bone may shrink during healing and may need grafting |
| Immediate implant after full extraction | Implant placed on the day of extraction; fewer appointments | The thin front bone can still remodel after the root is removed, with a risk of gum recession in the aesthetic zone |
| Immediate implant with socket shield (advanced and complex implant procedure) | Keeps a thin slice of root to help support the front bone and gum; well suited to high lip lines | Technically demanding; suitable only when the remaining root is healthy and free of infection; needs careful case selection |
The treatment journey, step by step
Phase 1 — Sectioning the root and keeping the front shield
The broken tooth was sectioned. The part of the root facing the tongue side was removed, while a thin portion on the lip side — the “shield” — was shaped and left in place, still attached to its natural ligament and blood supply.
Phase 2 — Placing the implant behind the shield
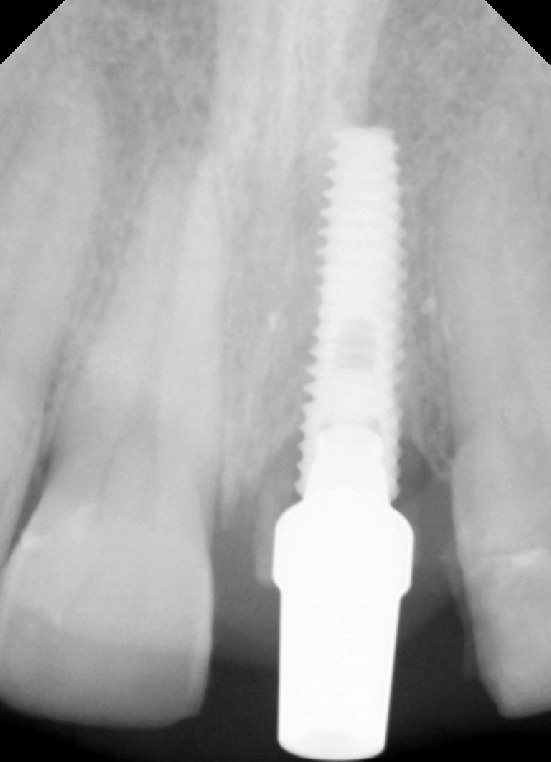
The implant was placed in the socket, positioned towards the palate, behind the preserved root slice. The shield sits between the implant and the thin front bone, helping to protect the bone and the gum line above it.
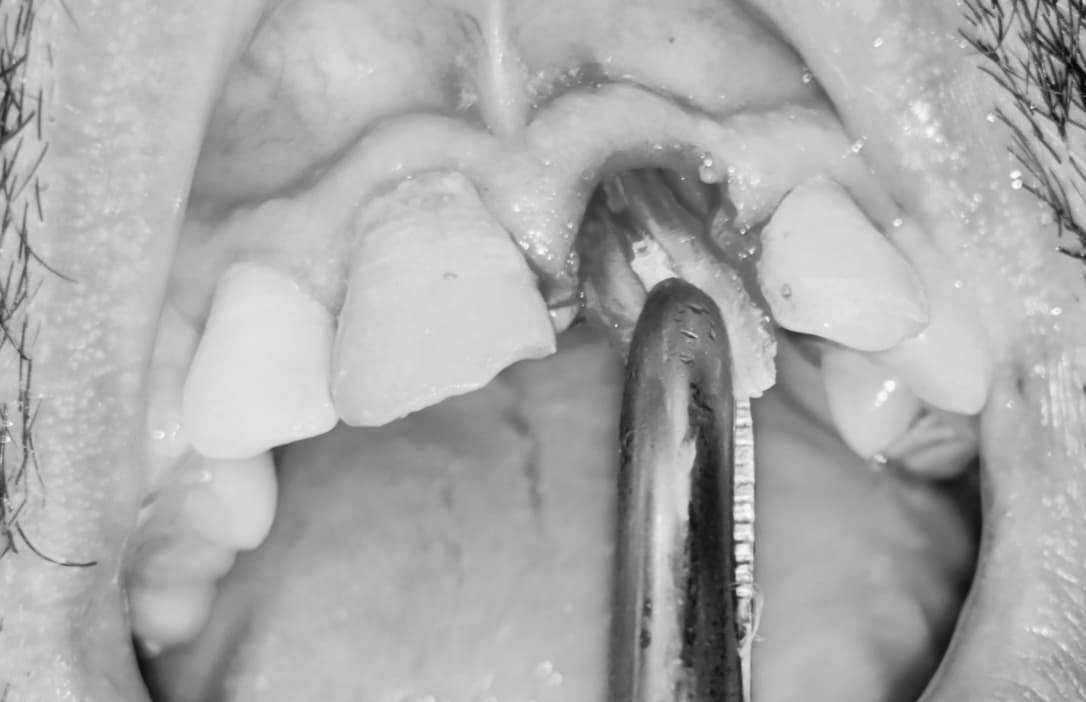
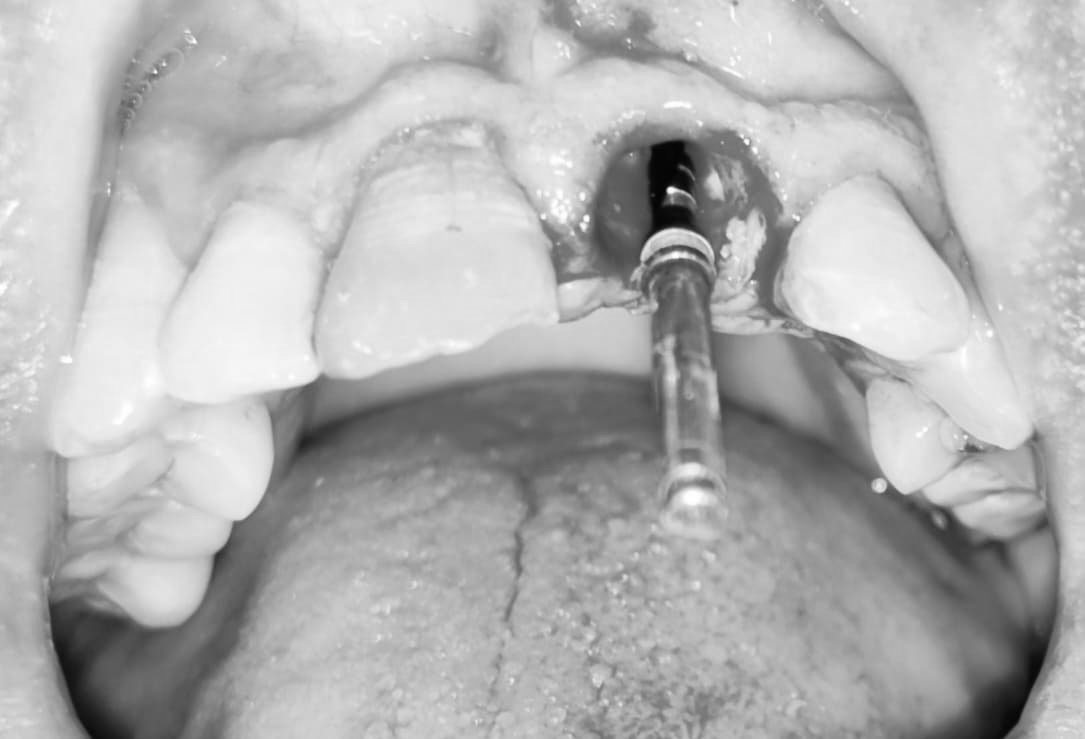
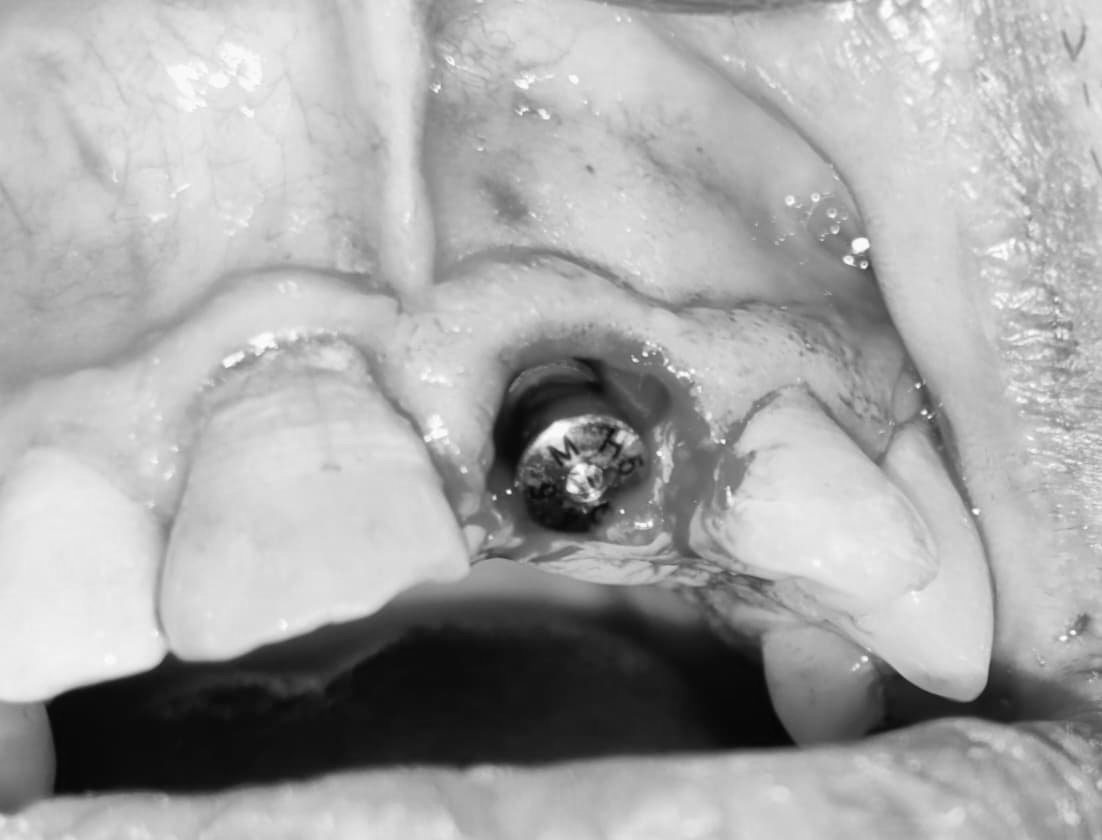
Clinical photographs are for educational purposes only. Images showing surgical bleeding have been converted to black and white.
Phase 3 — A temporary crown the next day
The patient was given a temporary crown the next day, in time for his performance that evening. He was happy with how it looked. A temporary crown on a fresh implant is shaped to stay out of heavy biting contact while the implant integrates with the bone. Over the next four months the implant was left to integrate with the surrounding bone, and the gum was left to settle around it.
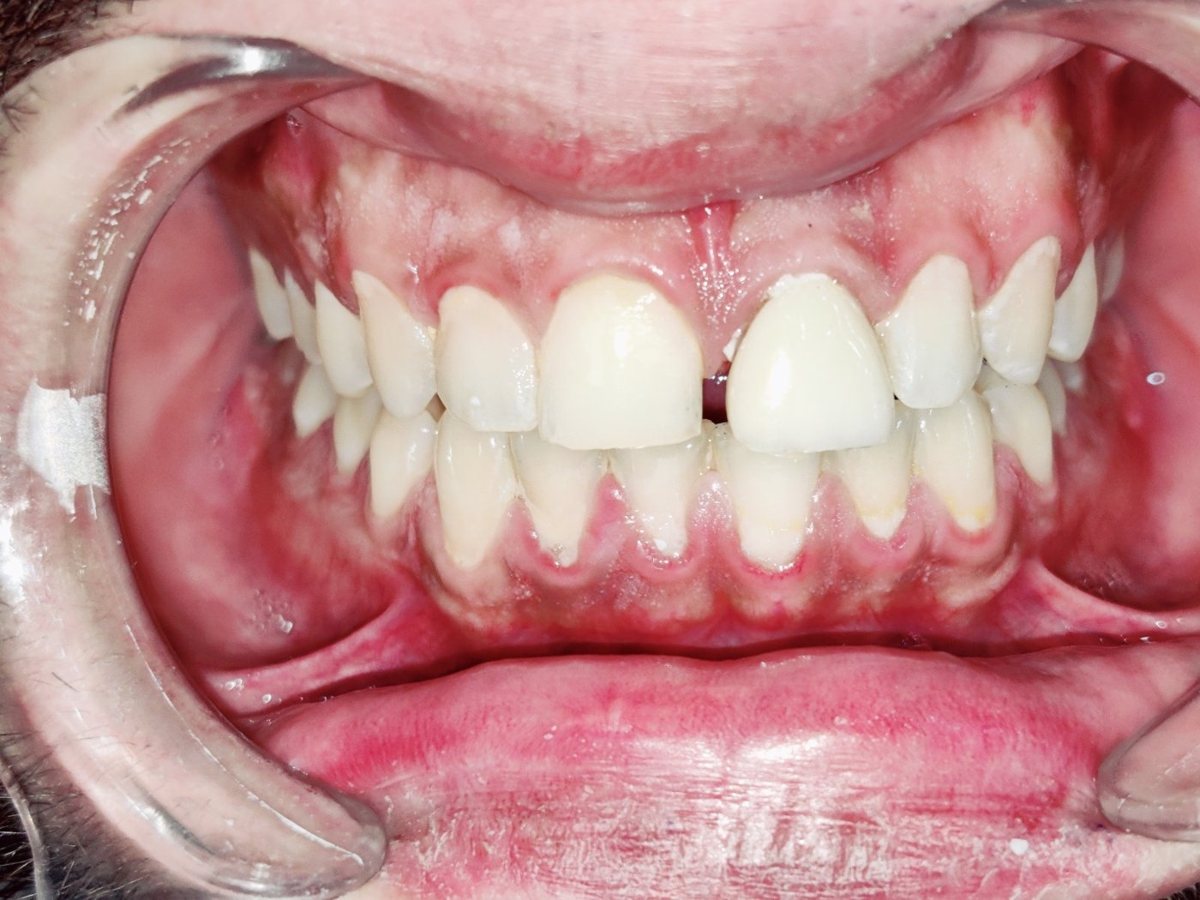
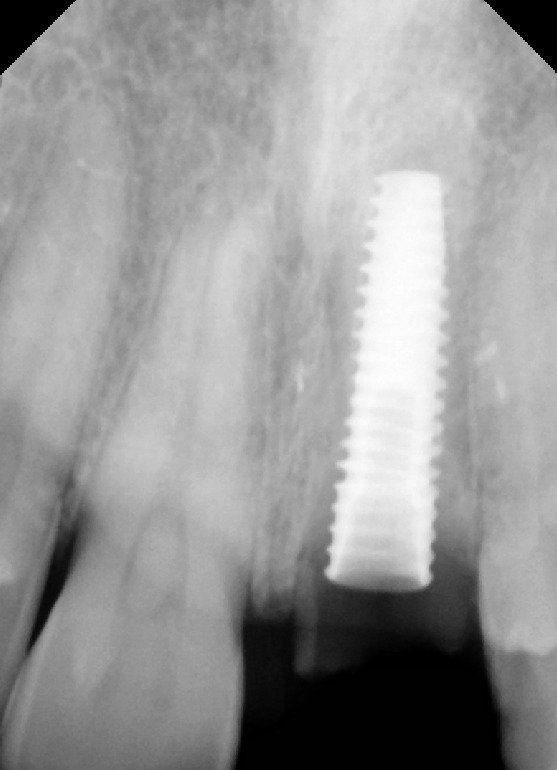
Clinical photographs are for educational purposes only.
Phase 4 — Four months later: the gum had held its position
After four months the patient returned for the final crown. The gum over the implant had healed so well — and held so much of its original height — that it now sat slightly fuller than the gum over the neighbouring tooth. Rather than a recession to correct, there was a small amount of extra gum to refine.
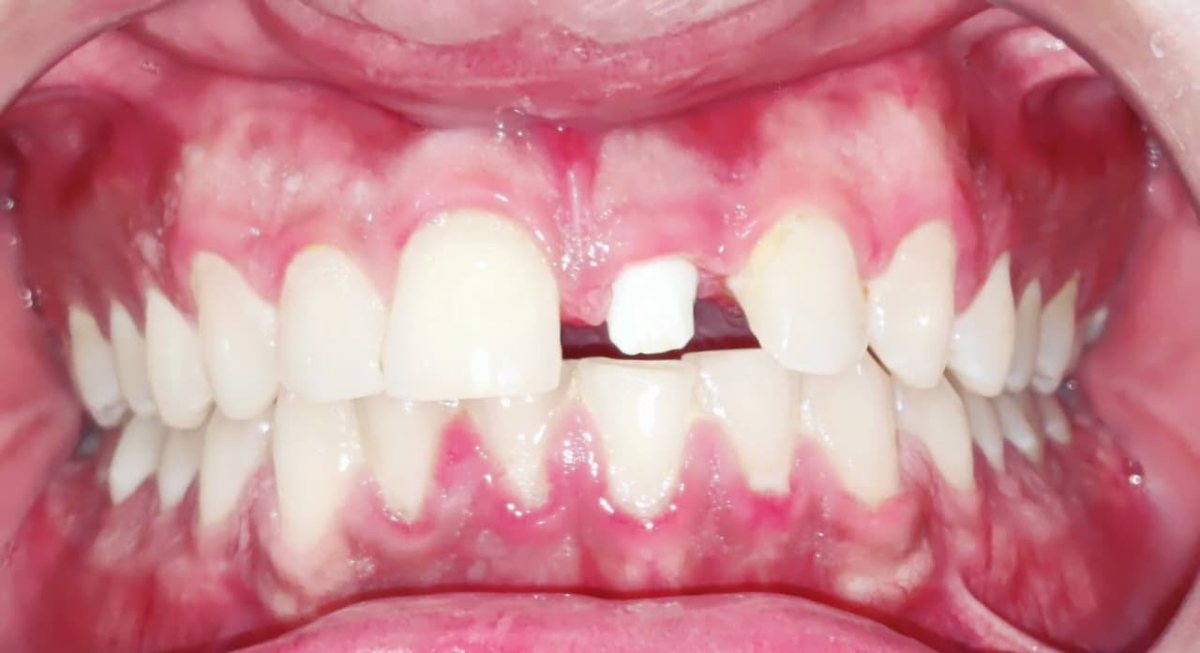
Clinical photographs are for educational purposes only.
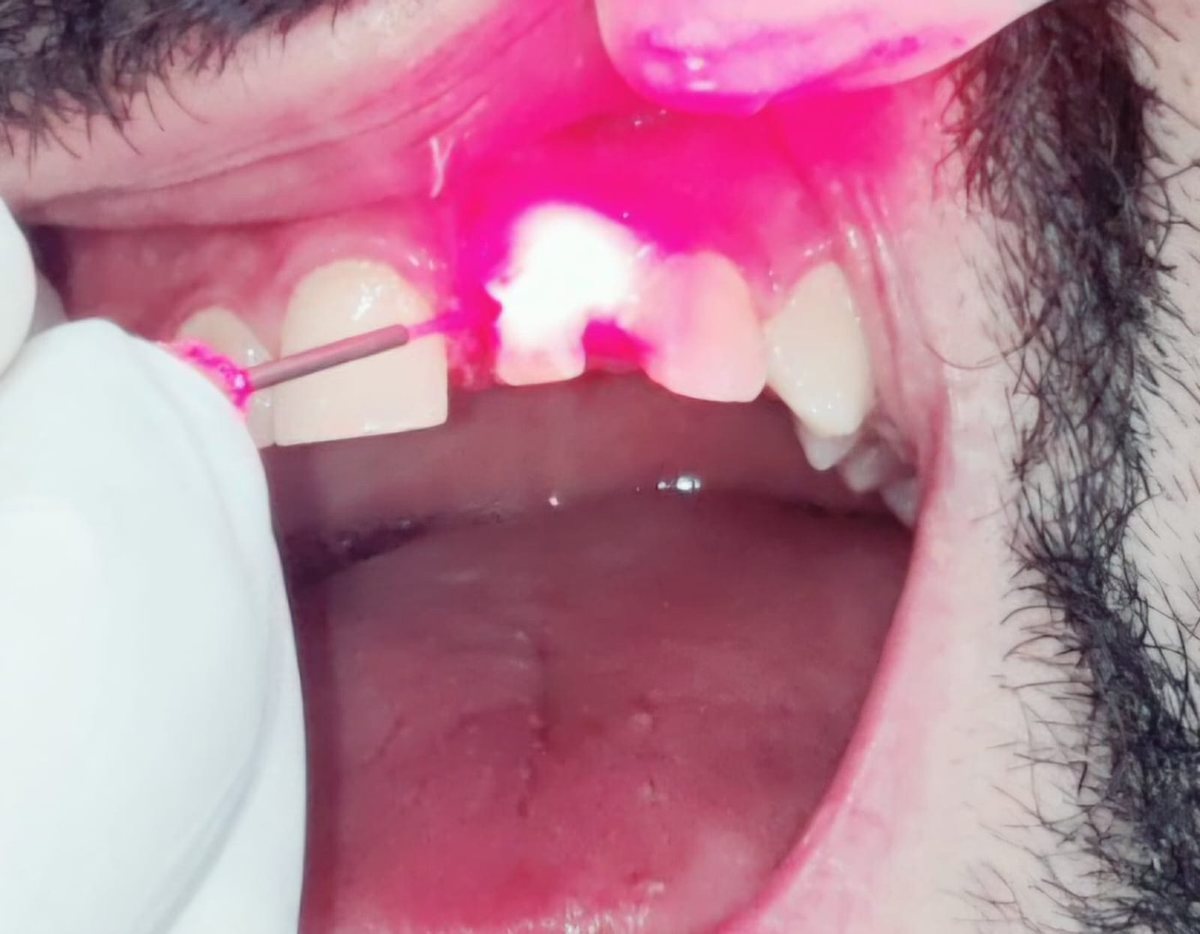
Phase 5 — Laser contouring to match the neighbouring tooth
A dental laser was used to reshape the gum margin over the implant so that it matched the contour of the adjacent front tooth. Because only soft tissue was being refined, this was a small procedure.
Clinical photographs are for educational purposes only.
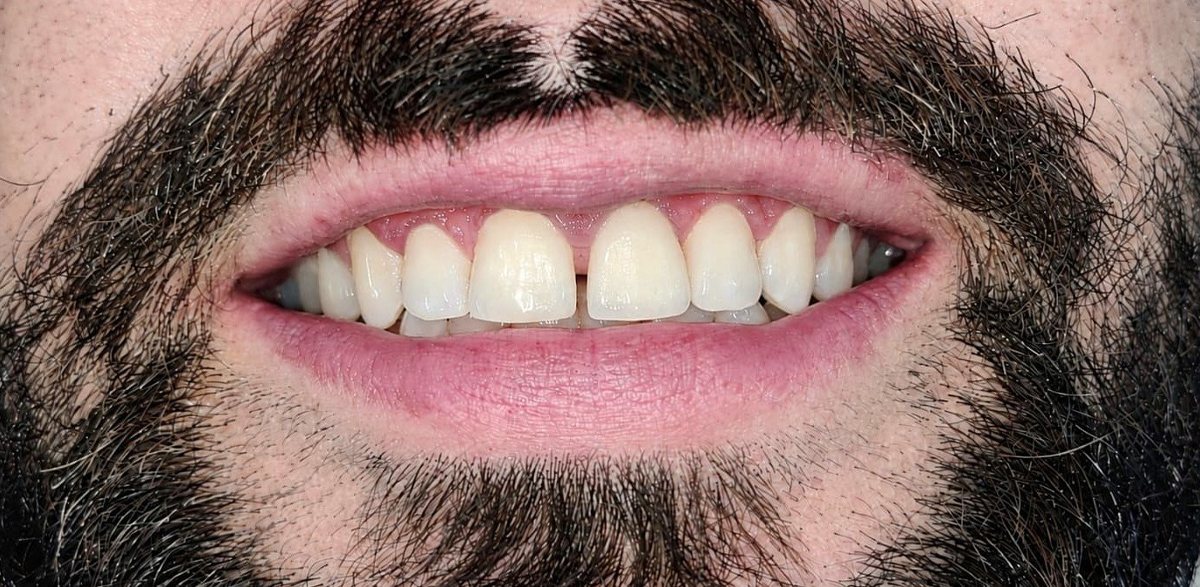
Phase 6 — The final crown, with the gap he asked for
The patient was particular that his front teeth should look as they had at his first visit, including the small gap between them. The final crown was made to recreate that gap, and the result was fitted. He was delighted that his smile looked like his own again.
Clinical photographs are for educational purposes only.
The principle, in one line
On a front tooth, protect the gum before you replace the tooth: it is far simpler to trim a little extra gum than to rebuild gum and bone that have been lost.
Clinical photograph disclaimer
The clinical photographs and radiographs in this article are of a patient treated at Dr. Gupta’s Dental Implant & Orthodontic Centre and are reproduced with the patient’s informed consent. They are published solely for patient education and professional information, and have been cropped to exclude identifying features.
Photographs taken during the surgical stages, in which bleeding is visible, have been converted to black and white to reduce graphic content for general readers. No other alteration has been made that changes the clinical appearance of the teeth or gums.
The images illustrate the treatment of one individual; they do not represent a guarantee or prediction of outcome, and individual results vary according to each patient’s clinical condition. Reproduction or reuse of these images without the written permission of the clinic is not permitted.
What an immediate implant with socket shield can and cannot do
| What this treatment can do | What it does not do on its own |
|---|---|
| Replace a broken front tooth with an implant on the day it is removed | Suit every broken tooth — the root must be healthy, free of infection and not cracked through on the lip side |
| Help preserve the front bone and the natural gum line in the aesthetic zone | Guarantee the gum will never change — long-term stability still depends on bone, gum type and home care |
| Allow a temporary crown soon after surgery when conditions are right | Make the temporary crown ready for full biting — it is protected while the implant integrates |
| Reduce the likelihood of needing a gum or bone graft later | Remove the need for regular check-ups, cleaning and X-rays of the implant |
Signs a front tooth should be checked
- A front tooth that has broken or chipped, especially one with an old root canal filling
- A crown or front tooth that feels loose or moves when you bite
- A darkening front tooth, or a grey shadow at the gum line
- Tenderness on biting, a small gum boil, or a bad taste near one tooth
- Gum that is receding over one front tooth but not its neighbour
A broken front tooth is often more urgent than it looks. Being seen early keeps more options open — including keeping part of the root, as in this case.
Common questions from patients
What is the socket shield technique?
It is an advanced and complex implant procedure for front teeth in which a thin slice of the tooth’s own root, on the lip side, is kept in the socket and the implant is placed behind it. Because that slice stays attached to its ligament and blood supply, it helps support the bone in front of the implant and the gum line above it.
Can an implant really be placed the same day the tooth is removed?
In suitable cases, yes. It depends on the health of the socket, the amount of bone available and how firmly the implant is held when it is placed. Your dentist will assess this with an examination and X-rays.
Can I have a temporary tooth straight away?
Often, when the implant is stable enough at placement. The temporary crown is designed to look natural but to avoid heavy biting while the implant integrates. In this case it was fitted the next day.
Why was laser treatment needed if the gum was preserved?
Because it was preserved so well. After healing, the gum over the implant was slightly fuller than over the neighbouring tooth. A small laser contouring brought the two gum margins into line.
How long does the whole process take?
In this case, about four months from implant placement to the final crown, with a temporary crown worn in the meantime. Timelines vary with bone quality and healing.
Is the procedure painful?
It is done under local anaesthetic. Most patients report mild soreness and swelling for a few days afterwards, managed with routine painkillers as advised.
What does it cost?
Fees depend on the implant system, whether the socket shield technique is suitable, the temporary and final crowns, and any gum contouring. We quote in writing after the examination and X-rays.
Where we are with this case
The final crown is in place, and the patient’s smile — including the gap he wanted kept — has been restored. He will continue with routine reviews of the implant and the surrounding gum.
Dr. Gupta’s Dental Implant & Orthodontic Centre in Gurugram plans and carries out advanced and complex implant procedures, including immediate implants and the socket shield technique, alongside routine implant treatment.
Dr. Gupta’s Dental Implant & Orthodontic Centre
Dr. Ankur Gupta, BDS, MDS — Orthodontics · Haryana Dental Council Reg. No. 1378A
H. No. 1280, Main Market, opposite Community Centre, Sector 31, Gurugram, Haryana 122001
+91 93158 35116 · +91 98996 14642 · drguptadentalcentre@gmail.com
Monday–Saturday 9:00 AM–1:30 PM and 5:00 PM–8:30 PM · Sunday closed
Medically reviewed by Dr. Ankur Gupta, BDS, MDS (Orthodontics), Haryana Dental Council Reg. No. 1378A, Dr. Gupta’s Dental Implant & Orthodontic Centre. This article describes one patient’s presentation and treatment and is published for general education. It is not a diagnosis and not a substitute for an in-person examination. Clinical photographs are published with the patient’s informed consent, for educational purposes only, with identifying features removed; images showing surgical bleeding have been converted to black and white. Individual results vary.